
ORIGINS 4.1 – THE LATEST FUNCTIONS
- Freddie
- May 11, 2023
- 11:00

Discover all-new functions in the latest 4.1 Origins Release!
Due to our constant development and the inspiring feedback from our users, PointCab Origins 4.1 comes with many new functionalities and enhancements. Check out the new functions below.
NEW FUNCTIONS
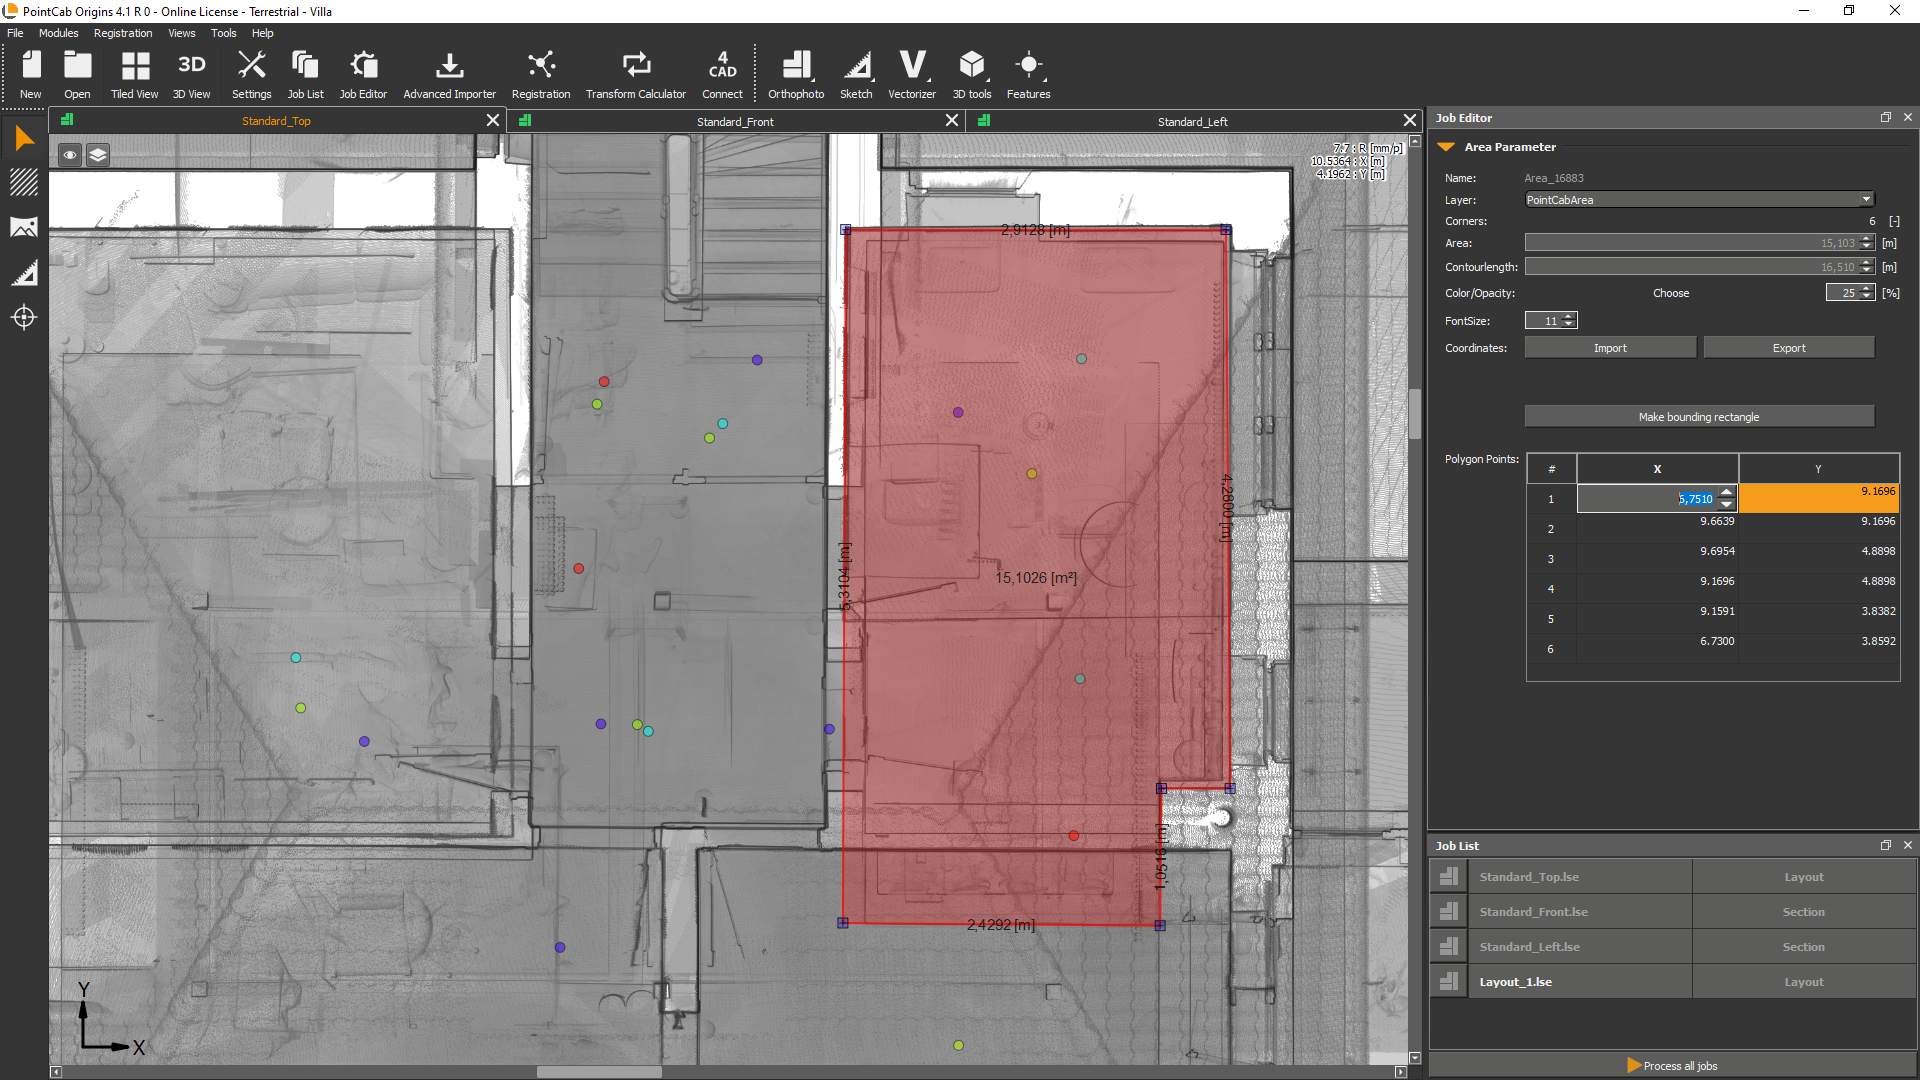
Polygon editor for area-based tools
What it’s for?
View and edit the coordinates of your polygon points in the job editor!
How it’s done:
When creating a surface the coordinates of the polygon points appear in the job editor and can be adjusted there. This affects all functions of the area tool and all functions that are related to areas: Merger, point cloud export, volume, and mesh.
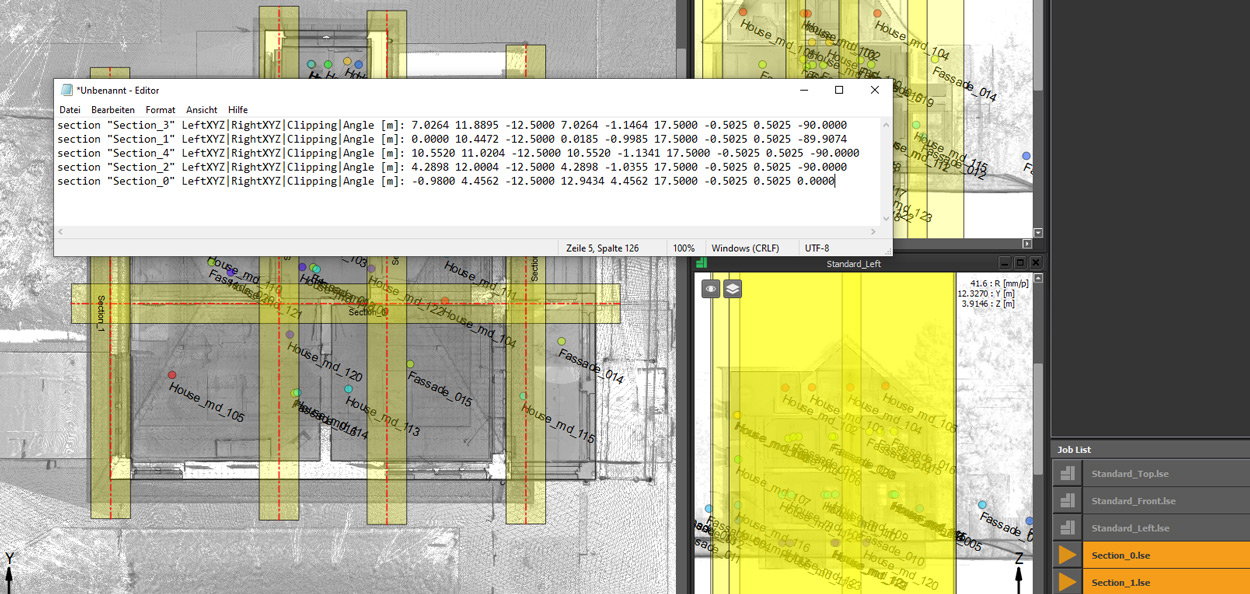
Export origin point of sections in .dwg (customer request) 💡
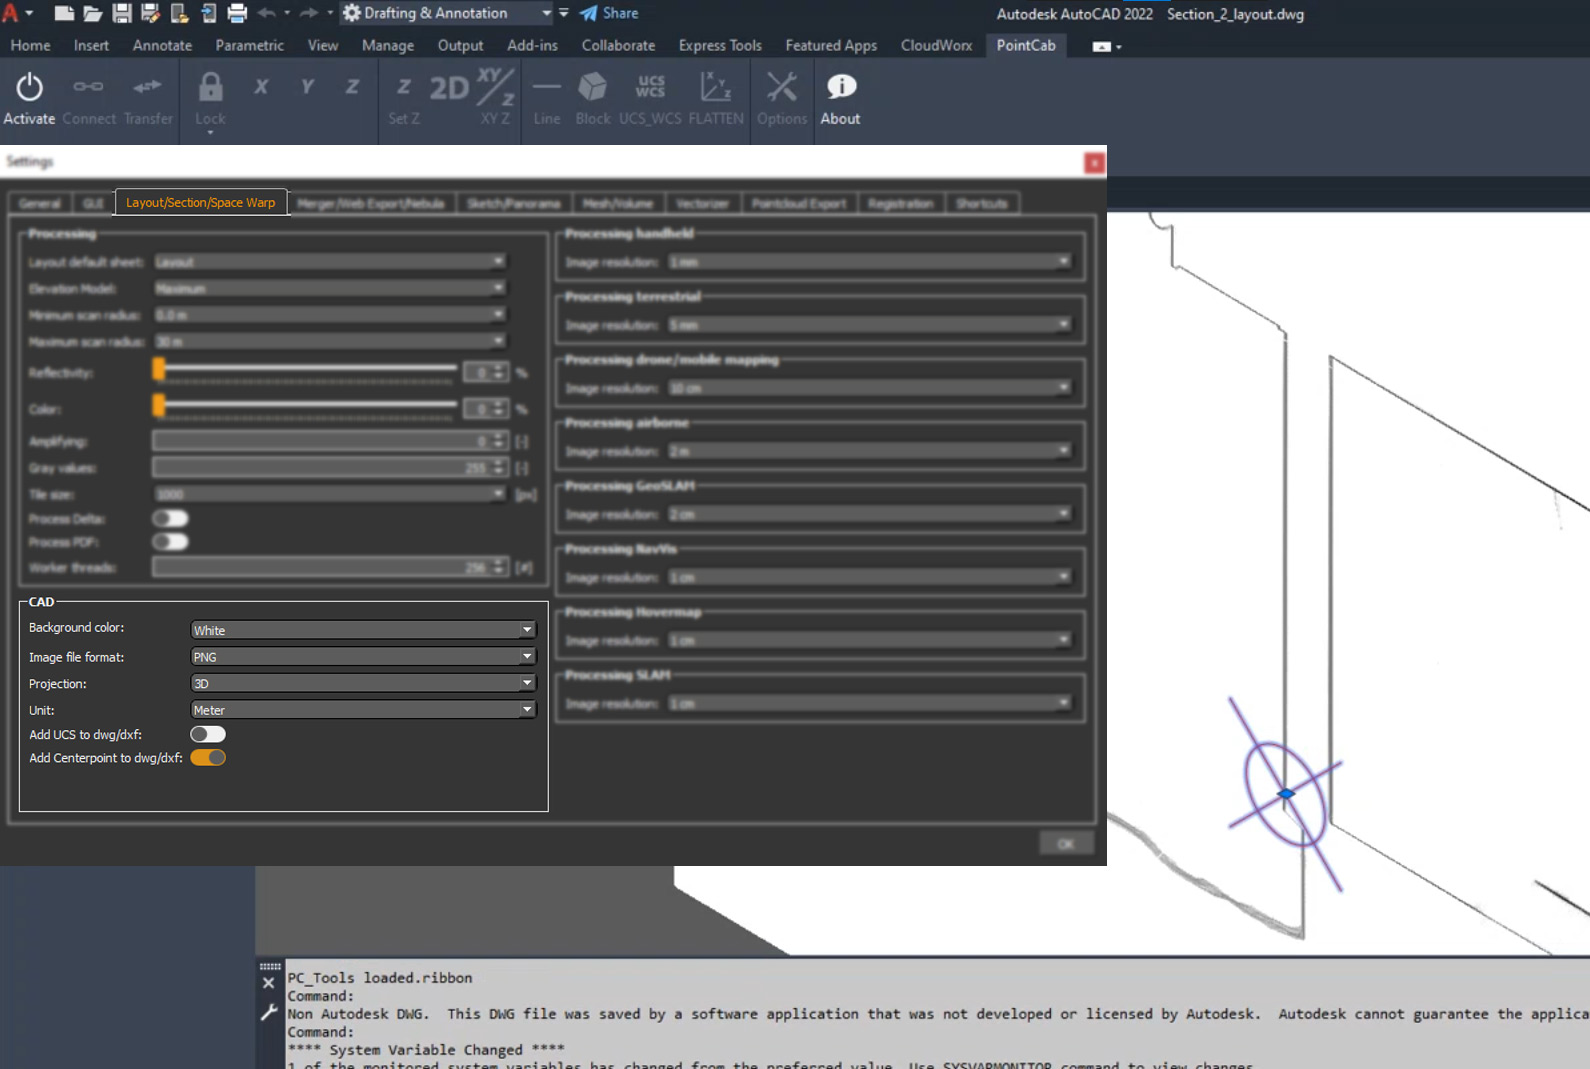
What it’s for?
When exporting a section, the center of the section is exported as an additional CAD element called “origin point”. This way the reference point is preserved and you are quickly able to restore it, in case you need it. (A crosshair will be displayed in AutoCAD)
How it’s done:
Go to Layout & Section Tool > Create Section > Settings > Layout/Section/Space Warp > CAD > Activate “Add Centerpoint to dwg/dxf” under “Option”.
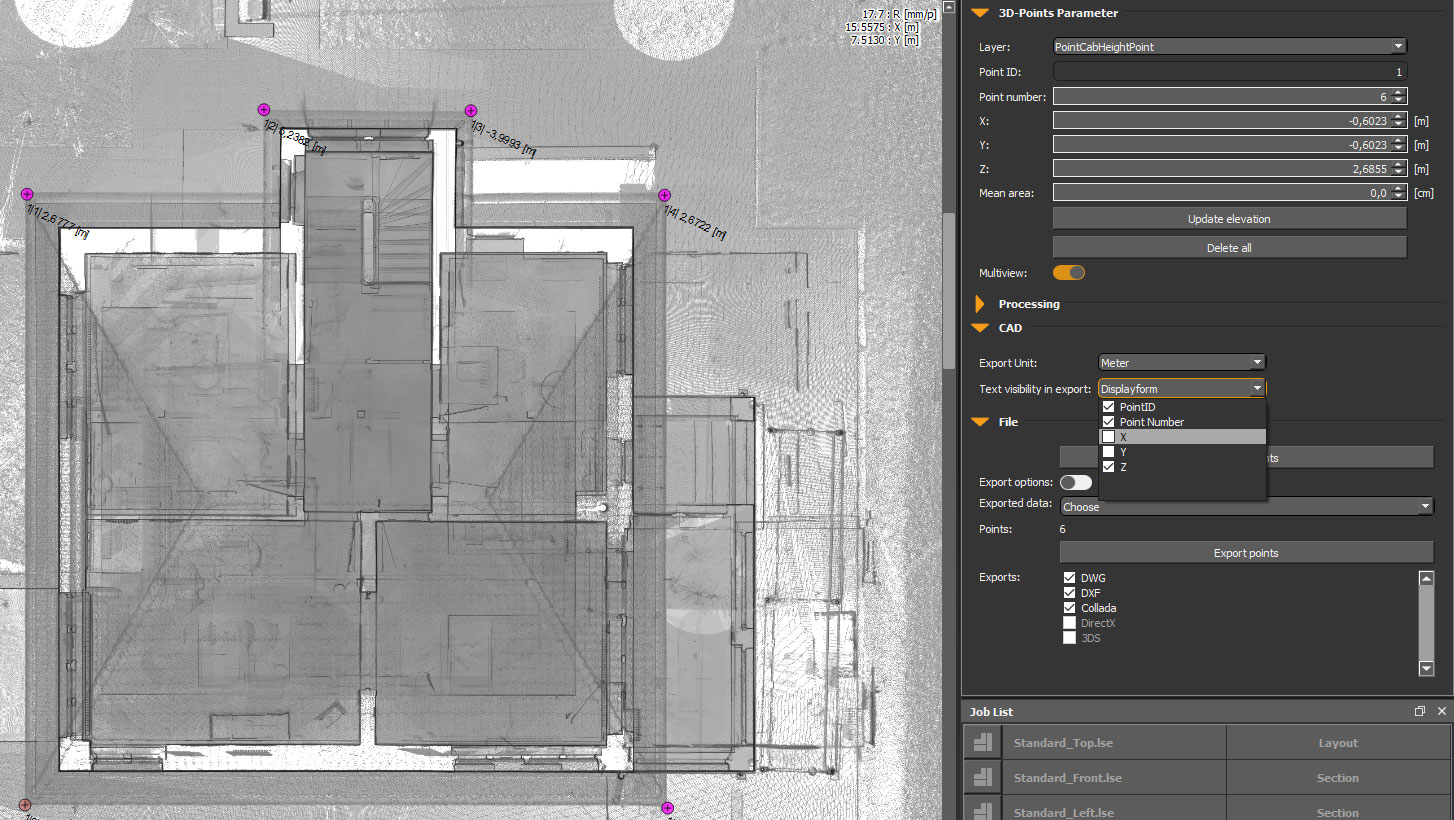
Customized 3D Point export to .dwg
What it’s for?
Now you can choose your preferred data format for exporting points to .dwg!
How it’s done:
In the Job Editor under “CAD” you can now find the “Text visibility in Export”. Here you can define where PointID, Point Number, and X, Y, Z information shall be exported to. When the 3D points are exported, the corresponding folder opens directly. Therefore right-clicking “show in folder” is no longer necessary. In the .dwg file, the selected information will be displayed next to the point. The same functionality is also available under the “File” tab in the Job Editor.
“Save as” Functionality to .pcp (PointCab Project)
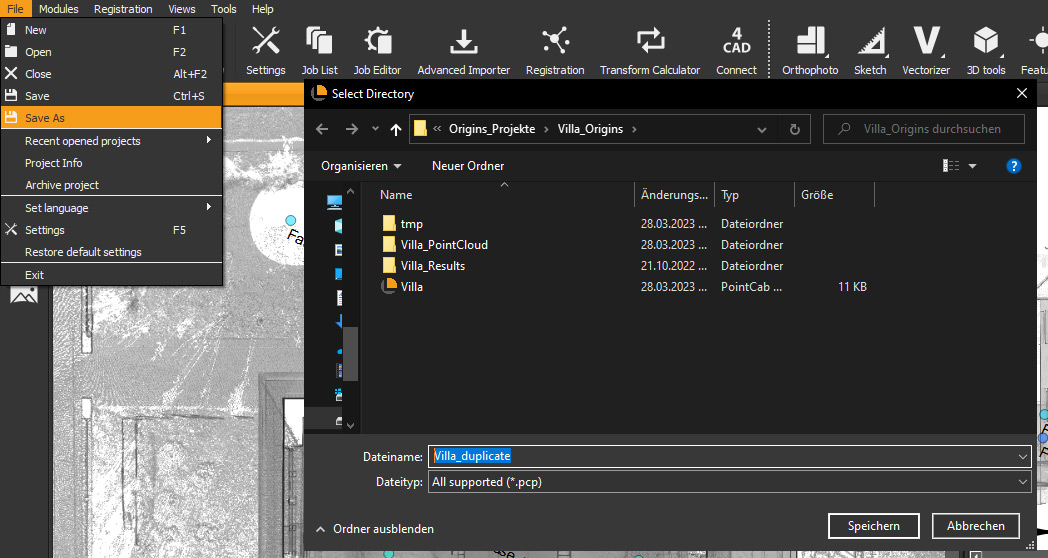
What it’s for?
Finally, a new way to duplicate your project! Previously, you could only archive a project and then had to pack and unpack it again… These times are finally over!
How it’s done:
Just go to File > Save As: Origins saves a copy of your current project state in the background. Isn’t that great?
Export Orthophotos position (customer request) 💡
What it’s for?
Export the positions of several layouts with ease!
How it’s done:
Select all your layouts with the selection arrow or Ctrl + A, then copy them with Ctrl + C and simply paste them into your text editor. You will easily get all layouts with name and order Lefthandle | Righthandle | Center, as well as all 3D points.
Toggle on/off names of Panoramas
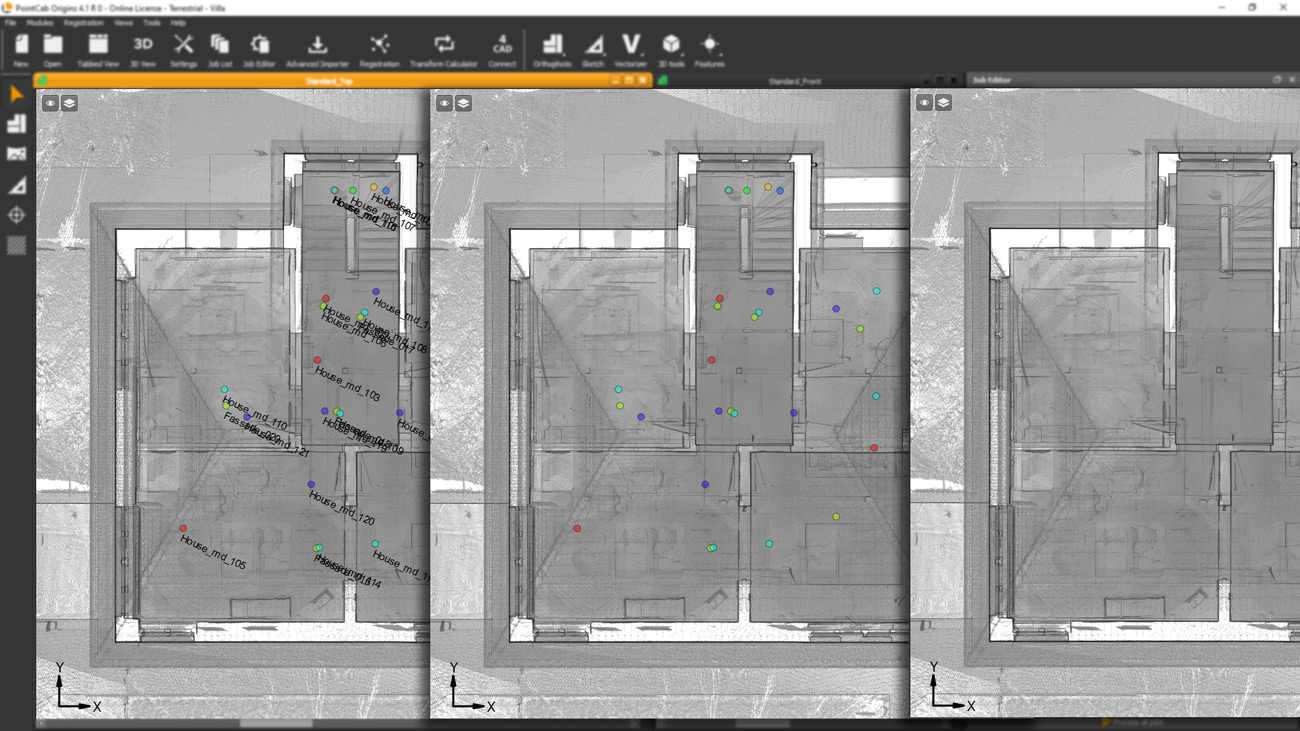
What it’s for?
Finally a clearer display of panoramas – due to a third option!
How it’s done:
The names and positions of the panoramas can easily be hidden by pressing the “P” key. We love the new feature, try it out yourself right now!
Sections with enhanced reflectivity
What it’s for?
The new option enhances the reflectivity in your panoramas and in sections!
How it’s done:
In the panoramas, there is a new sheet that enhances reflectivity. If the “Enhanced reflectivity” slider is checked, the reflectivity will be displayed with increased contrast. To use it for sections just create a new one and set the reflectivity to 100% in the Job Editor under “Processing” and activate the slider for “Enhanced Reflectivity”. Now calculate your job and the sheet with “Enhanced Reflectivity” is available. Lookin’ good, isn’t it?
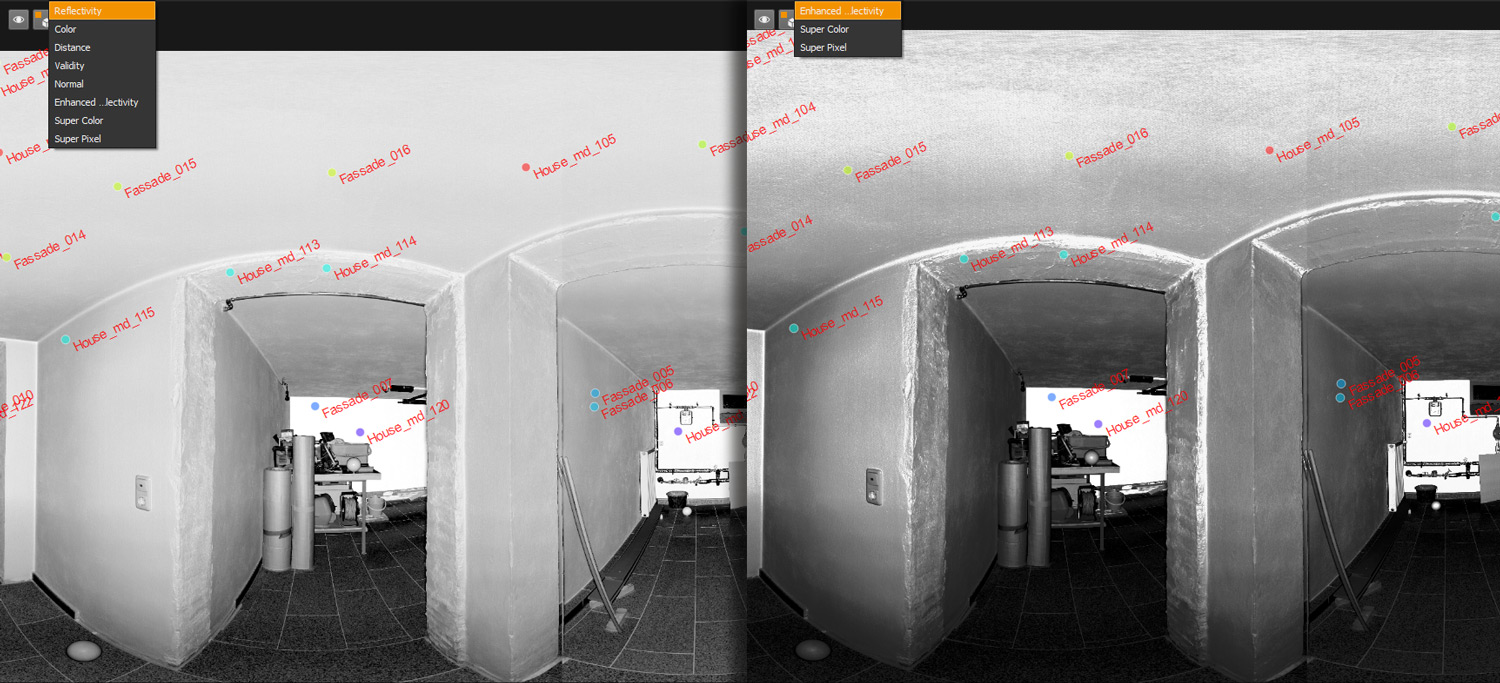

Click to enlarge the picture
Export all panoramas in different file formats
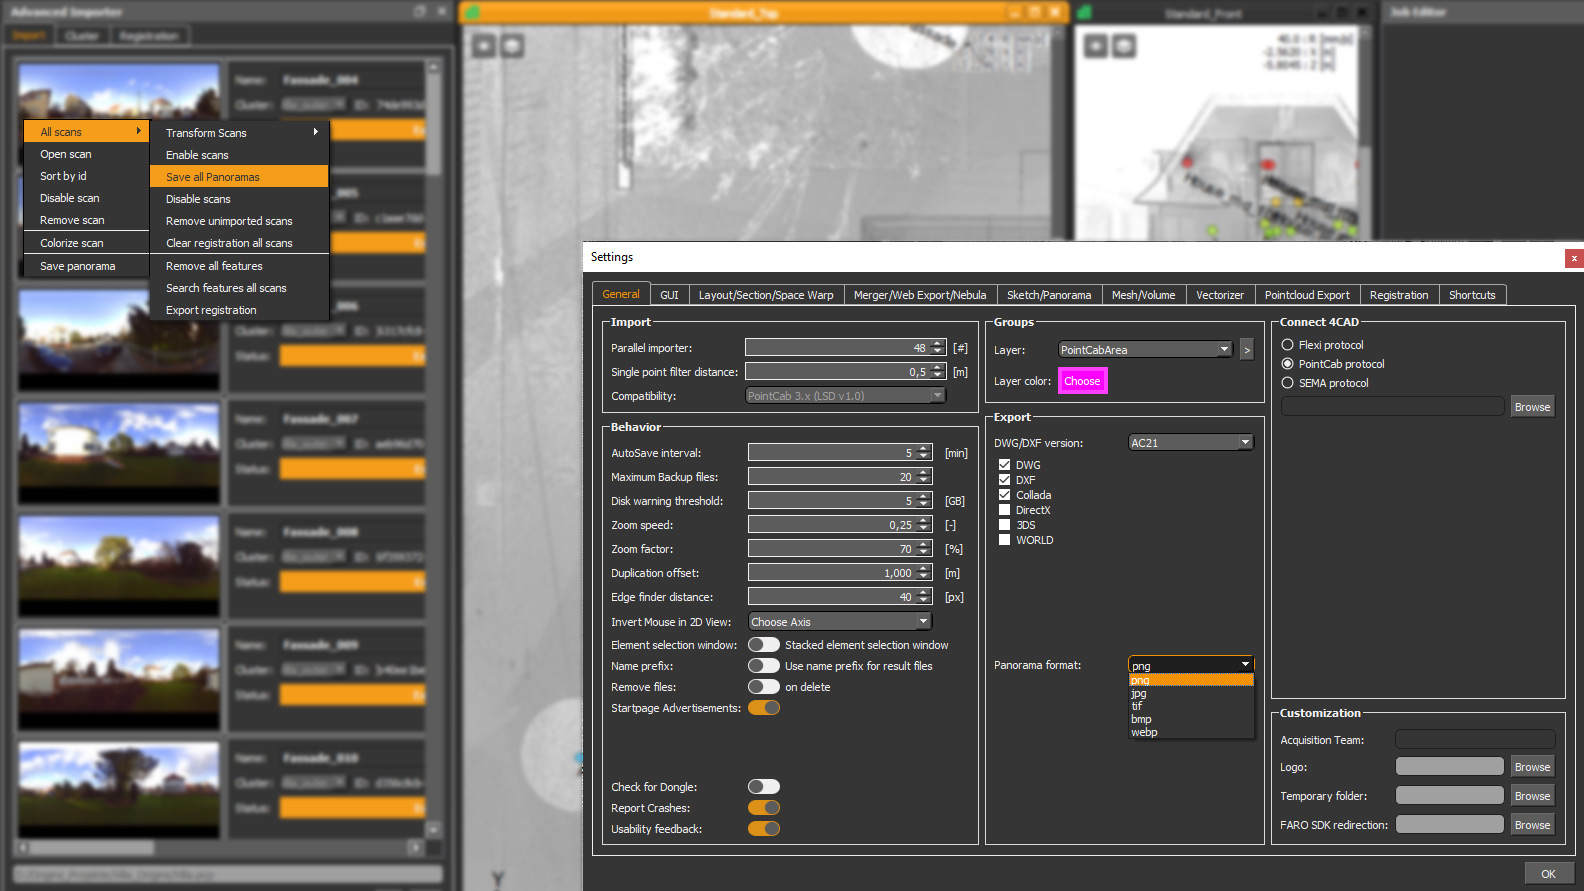
What it’s for?
This new option helps you to convert your panoramas into your desired image file format. You can choose between png, jpg, tif, bmp, webp
How it’s done:
Before exporting the desired panoramas, choose your preferred format for exporting in the settings under General > Export > “Panorama format”.
Once that’s done, go to the Advanced Importer > “Import” tab: do a right click: select All scans > “Save all Panoramas” and export all panoramas in your preferred file formats!
⚠️Cloud-to-Cloud (C2C) Test / Beta⚠️
What’s it about?
We intend to offer a full-fledged cloud-to-cloud (C2C) registration in Origins. For now, this is our first attempt to provide C2C in Origins 4.1.
Here’s what to keep in mind:
We explicitly don’t recommend using this C2C in its current form to register actual projects!
But we would like to encourage you to test our C2C beta and we’re excited about your experiences and feedback about it.
GENERAL IMPROVEMENTS
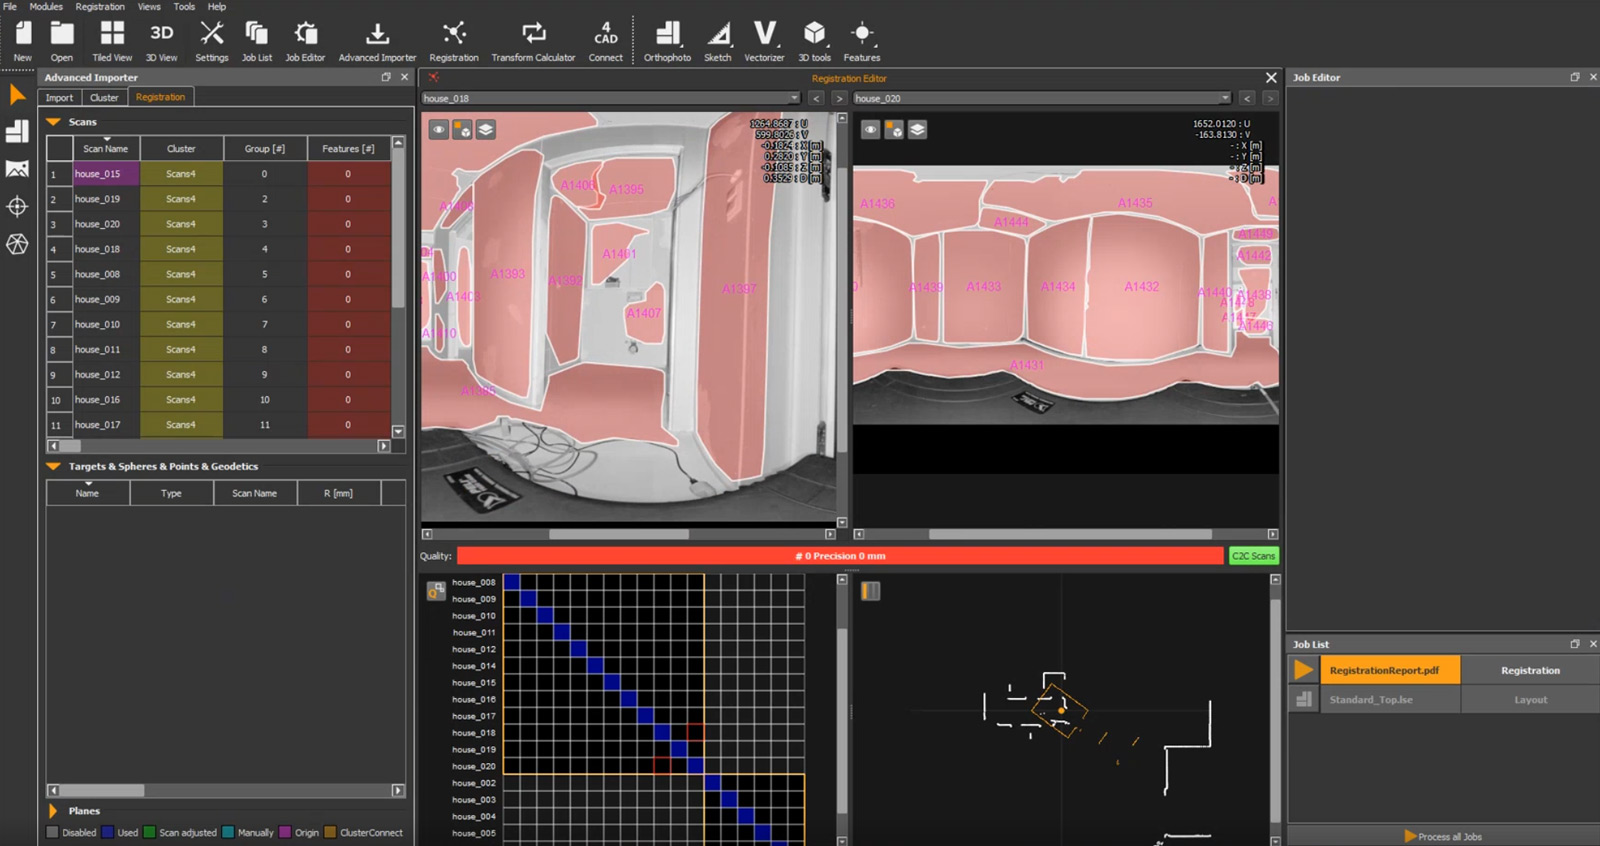
Plane position names inside the plane area
What it’s for?
Improved visibility: In the Registration Editor, the labels of the recognized layers are now displayed within the respective layer.
Optimized Nebula Export
What it’s for?
Just a much faster Nebula Export to get your point cloud projects into the cloud!
Who doesn’t want that?
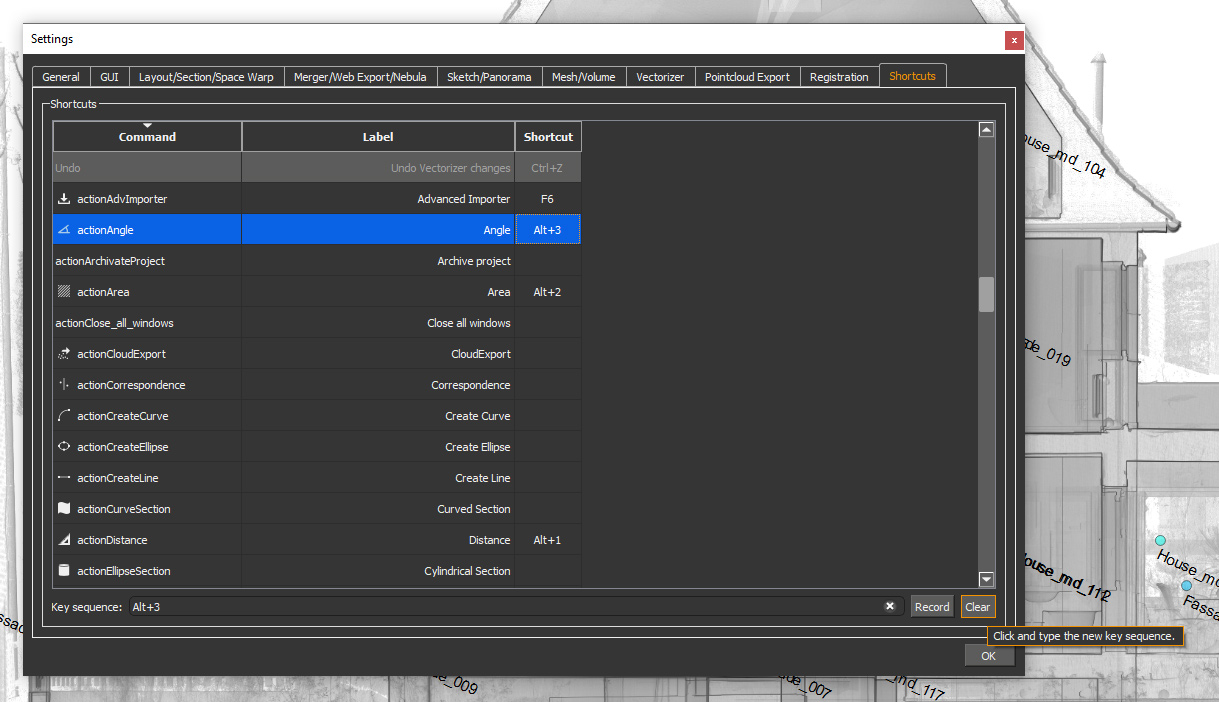
Shortcut Manager improvements
What it’s for?
We have added a Clear-Button in the Shortcut Manager. Maybe just a little improvement for your user experience but we think you deserve it.
How it’s done:
Settings > Shortcuts: New “Clear Button” to delete user-defined shortcuts.
The “Record Button” can then be used to record as usual.
Project main files backup

What it’s for?
When changes are made to the project, Origins now creates automatic backups in the background!
How it’s done:
You don’t have to worry about it, origins will create the backups for you automatically!
Customizable zoom speed
What it’s for?
Adjust the zoom speed in the 3D viewer the way you prefer it.
How it’s done:
Open the 3D Viewer and click on the Gear Icon in the upper left corner. Then you’ll be able to adjust your zoom speed in the “3D View Parameter” in the Job Editor. This setting can also be found under Settings > GUI > 3D Control > Zoom Speed

Advanced project information
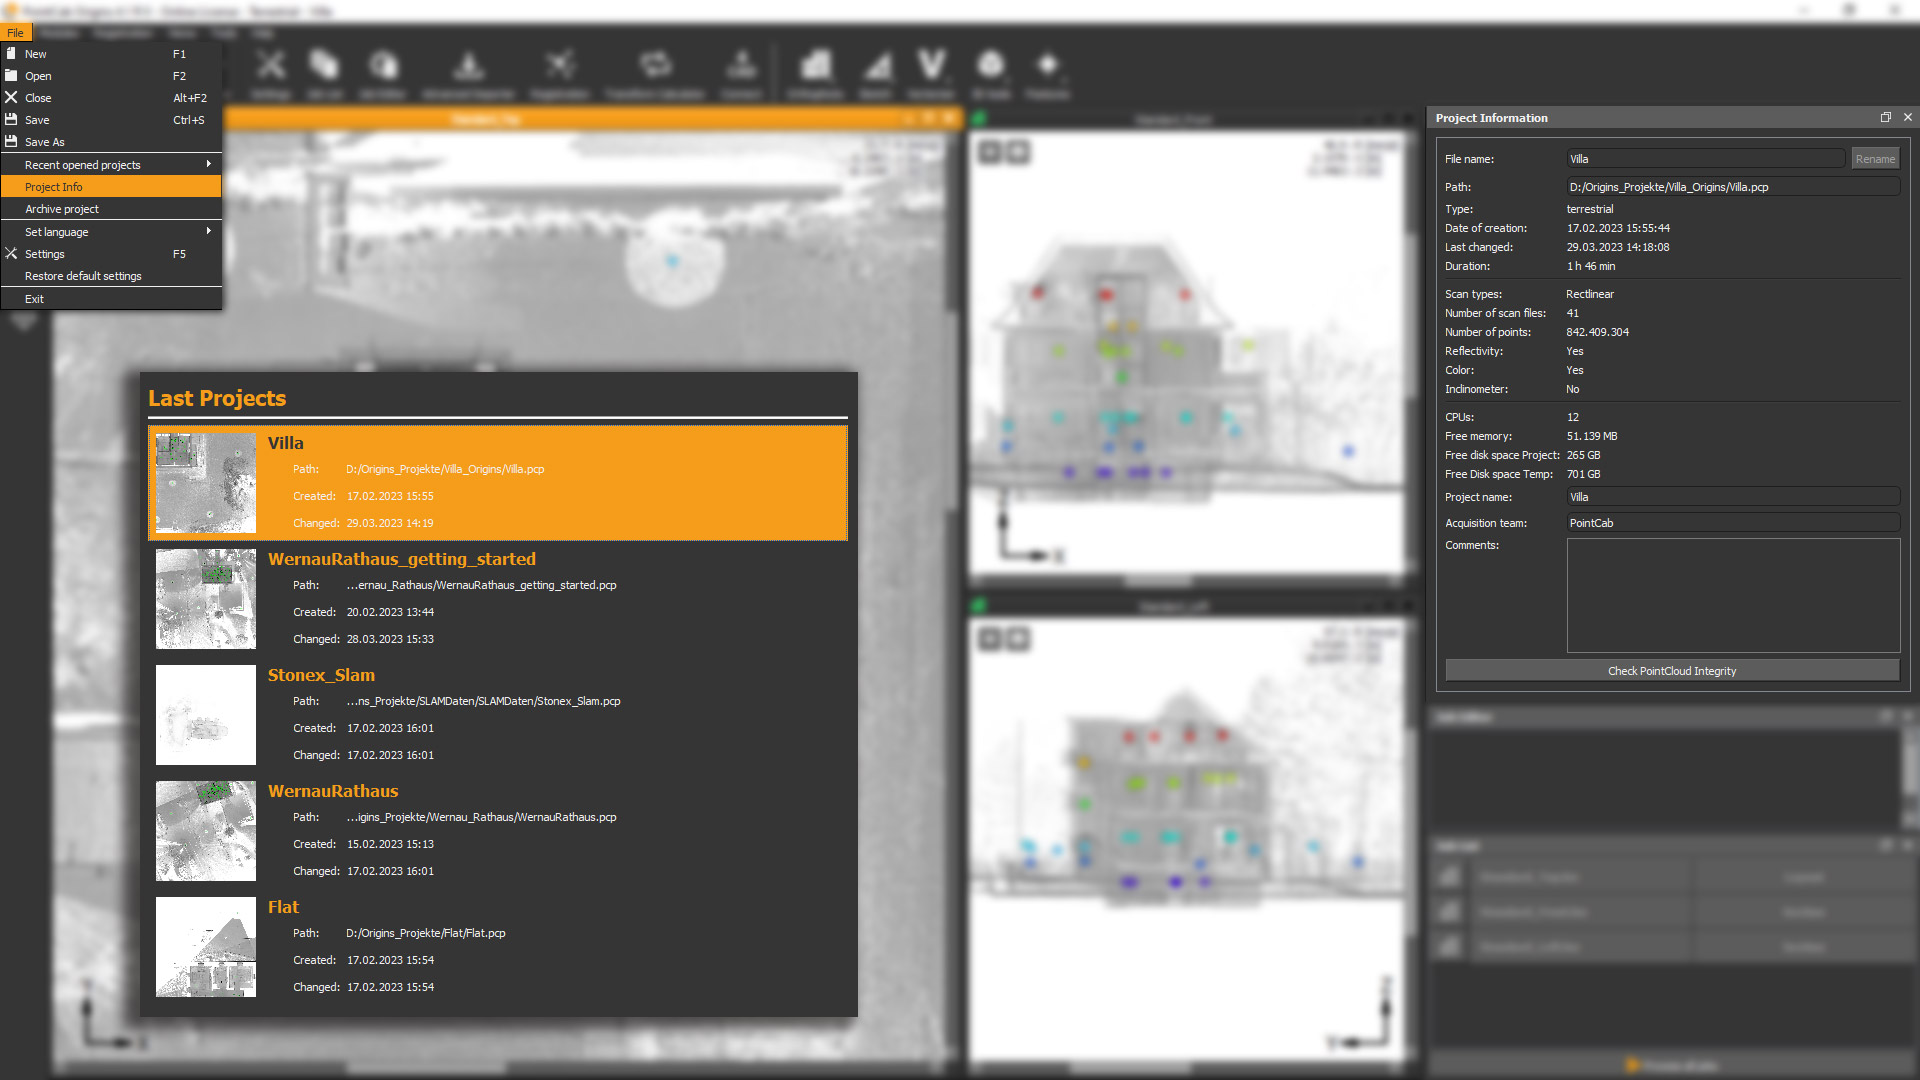
What it’s for?
This handy feature keeps you on track with your project information!
How it’s done:
You might have noticed it already when opening Origins: in the Last Projects overview, more project details are now displayed!
Curious about more information? Just open your project and go to “File” > “Project Info”. Now you can view your “Project Information” above the Job Editor. Have a look at e.g. the creation date, date of last changes, total processing time, and much more!
Layout center line visible in all standard views
What it’s for?
The red dotted line of a section, which marks the center of a section, will now also be displayed in the left-view orthophotos window.
How it’s done:
No need to change anything. Origins does that automatically now.

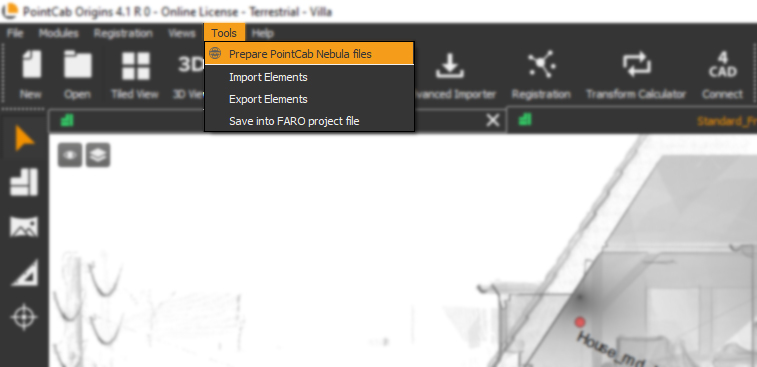
Save into FARO project file (customer request) 💡

What it’s for:
We have added the new function “Save into FARO project file” by user request.
How it’s done:
With this function, registration values (scan positions and rotations) can be directly written into an existing FARO LSPROJ file.
EXTENDED DATA FORMATS – IMPORT / EXPORT
FARO SDK/API update – Support of FARO Premium Scans
Fantastic news for all FARO Focus Premium users!
As of now, the scans can be imported from the Premium Scanner.
Import e57 files with panorama (for Mobile Mapping scan data)
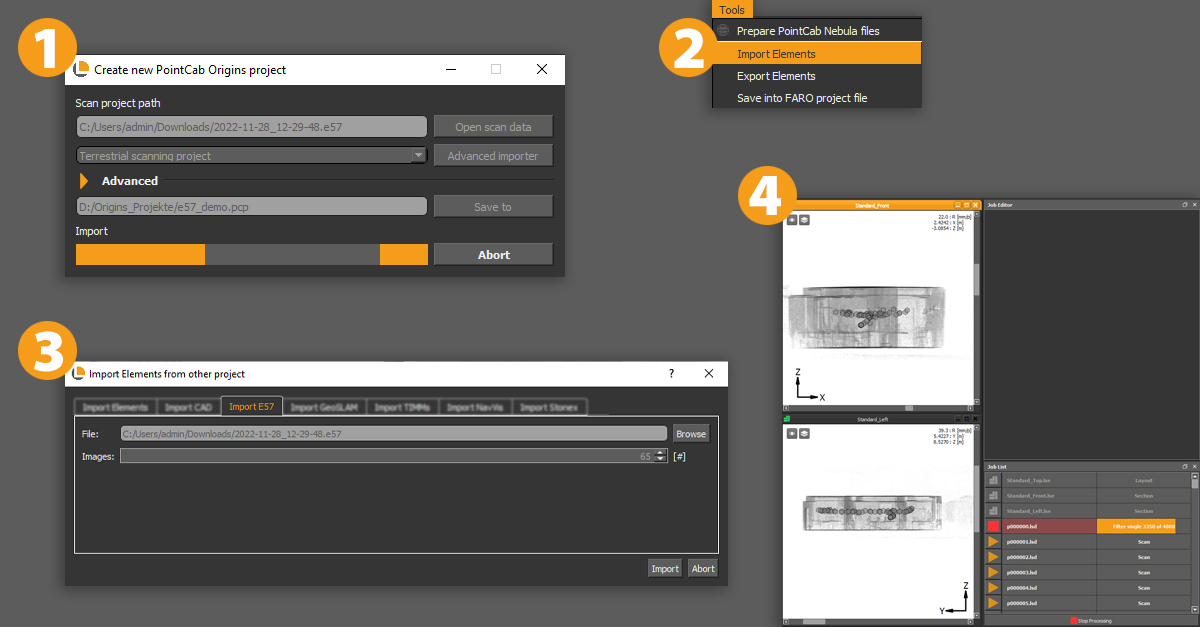
What it’s for?
Now you can write panoramas in .e57/.las format from datasets of NaVvis, GeoSLAM, and Stonex.
How it’s done with .e57 files:
- Create a new project and open your scan data. Select the .e57-file and save it to start importing your e57-file as a point cloud.
- Proceed to import the panoramas under “Tools” and click on “Import elements”
- Navigate to the “Import E57” tab and select the same file. There you can see how many panoramas are included. Click on import.
- Last step: simply calculate the panoramas in the job list.
How it’s done with Stonex files:
- Create a new project and open your Stonex data. Select the .las-file and save it to start importing your .las-file as a point cloud.
- After your Stonex point cloud has been successfully imported into Origins, go to “File” > “Import Elements”.
- Navigate to the “Import Stonex” tab and navigate to the location of your .txt file and press “Import”. Make sure that the option “Copy images to project” is activated.
- The panorama views appear as circles in your project and as jobs in the job list that need to be calculated. After Origins has processed the images, you can open them as usual by selecting the Panorama tool and clicking on the scan point in the standard views.
Please note:
The Stonex panoramas are just hemisphere panoramas (180 degrees) and therefore the point cloud cannot be back-projected onto them, which means that no measurements can be made. They are purely suitable for visualization purposes.
BUG FIXES
- Fix multiple transfer of 3D points through the 4CAD interface
- Fix SLAM Project type import parameters
- Fix import projects which contain symbols or ellipses
- Fix Auto Merger creation for Standard views
- Fix check for duplicates when importing geodetic points
- Fix resetting locked cluster position after repeating the registration
- Fix scan selection using a bounding box
- Fix 3D Points export column order